How to measure for Drapery

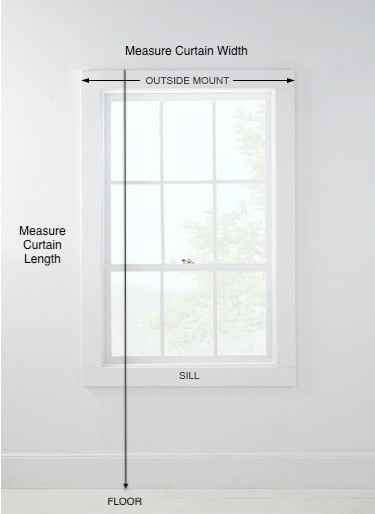
Measuring for drapes if drapery rod is not installed

Measuring Width

Measure the width of window from outside molding to outside molding

Add 12” to this dimension (6” + 6” for each side) This is for rod will typically extend beyond the window frame

Divide this total dimension by 2. That is the width Per-Panel

Add 2” - 4” per panel for overlap and return

Measuring Length

Measure the length of window from outside molding to the floor

Add 4” for this dimension for drapery rod. This is the length

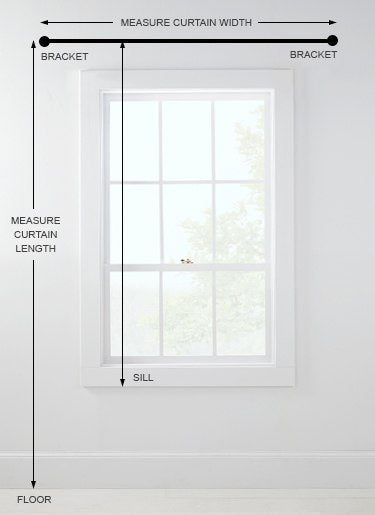
Measuring for drapes if drapery rod is installed

Measuring Width

Measure the width of window -Drapery rod - bracket to bracket

Add extra inches if drapery rod extended after the bracket - (Do not include finial)

Divide this total dimension by 2. That is the width Per-Panel

Add 2” - 4” per panel for overlap and return

Measuring Length

Measure the length of window from the rod to the floor

This is the length

Example of Measurement

Width

If the window width molding to molding is - 48”

Pleated panels - 48” + 12” = 60” divide by 2 = 30” + 2” = 32”. Thus 32” wide x 2 panels require to cover the window

Non pleated panels - 48” + 12” = 60” divide by 2 = 30” + 2 = 32” x 2.5 times (fullness) = 80” x 2 panels require to cover the window

Length

If the window length from outside molding is 94” .

Add 4” - 94” + 4” = 98” is the length

Notes for the length

You can take length as high as you would like to. For an example from the ceiling

Add puddle if desired - See our puddle guide below.

Add one inch extra for grommet header for the grommet placement

Add two inches extra if you order rod pocket with 2” flange

Determine the right length for the looks you want to achieve

Floor length
The curtains just touching on the floor. Measure from the drapery rod to the floor.

Puddling

About Puddle
Puddling is amount of extra drapery fabric that is puddled on the floor. Puddling can add style and opulence to your drapes.

Tailored puddle
Kiss the floor. Provides very clean look because the drapes just sit on the floor. Add 1” - 2” to the length

Casual puddle
Small break in the fabric where it meets the floor. Very elegant and pool nicely on the floor. Add 2” - 4” to the length

Moderate puddle
More break with some fabric resting on the floor. Creates a more dramatic and romantic look. Add 4” - 6” to the length

Luxurious puddle
Generous amount of fabric pooling on the floor. A truly opulent look. Add 6” - 9” to the length

  • Floor Length

  • Puddle Length

  • 1-2 Inches Tailored Puddle

  • 2-4 Inches Casual Puddle

  • 4-6 Inches Moderate Puddle

  • 6-9 Inches Luxurious Puddle

Installation of Drapery (How to hang)

You’ll receive ready to install Drapes

The Drapery pins can be adjusted to the looks you want to achieve. You can space them differently to adjust the folds width wise and raise or lower them to adjust the height length wise.

We iron and well pack the curtains in carton box. Pleated curtains are fan fold packed to have even pleats.

When the drapery is installed and hung on the rods, they may appear a little wrinkled or folded because of the packaging. This is normal, and these wrinkles and fold lines usually even out once curtains have been hanging for a while.

Dress your drapery hanging naturally, style them up with tie backs, create designer look with hold back.

Pleated Drapes - French pleat, Goblet pleat, Parisian Pleat, Inverted pleat or any other pleat style

Hanging with Pin/ hook and ring

Insert the drapery pins to the each pleat and at the edges

Insert each pin through the eyelets of the drapery rings, adjust pleats

Drapes are ready, beautiful drapery, gorgeous pleated look

Hanging with clip rings

Attach the clips at the edge of each pleat, adjust pleats

Drapes are ready, beautiful drapery, gorgeous pleated look

Flat pleat panels

Insert the drapery pins at the equal distance in even number

Insert each pin through the eyelets of the drapery rings, make pleats/ folds and drapes are ready

With clip rings attach clips at equal distance to the drapes, make pleats/ folds

The drapes are ready, beautiful folds looks

  • Insert Pins

  • Pin Hooks Pleated Curtains

  • Drapes Hanging Pin and Rings

  • Drapes Hanging Clip Rings

  • Flat Pleat Hanging Pin and Rings

  • Flat Pleat Hanging Clip Rings

Non Pleated Drapes - Grommet, Rod pocket, Back Tab

Grommet - Insert the grommets to the drapery rod, make folds and the drapes are ready, beautiful waves folds looks

Rod Pocket - Insert the drapery rod through the drape pocket, make gathers and the drapes are ready, nice gathered look

Back Tab - Inset the tabs to the drapery rod, make folds and space them out evenly, drapes are ready, nice folds looks

  • Rod Pocket

  • Back Tab Curtain

  • Grommet Header

Ripple Fold

Please Note ripple fold drapery require different track system

It has thee components - Track, Gliders and Carrier Pendants

You’ll receive ready to hang drapes with the snap tape behind

Fix the snaps to the carrier pendent to the track, create wave folds (S like folds)

The drapes are ready, creates a beautiful Waves/ S folds looks

  • Ripplefold Carrier pendent and Snap Tape

  • Ripplefold Drapery

  • Ripple Fold

Number of Rings Required for Pleated Drapes

The detail below is indicative only and could be change as per actual window size for custom drapery

Plus or minus 1 - 4 rings. Thus we recommend to have a few extra rings

The finished width for pleated curtains mention below is 2.5 x fullness

We recommend 2.5 x fullness for drapery and 3 x fullness for sheer curtain. Provides nice, gorgeous fall and luxurious looks.